I recently self installed solar panels on my home. In the process of doing tons of the research, design, permitting and self installation of a 9.24 kW solar system I have unwittingly become somewhat of a solar expert. I thought I would share what I learned.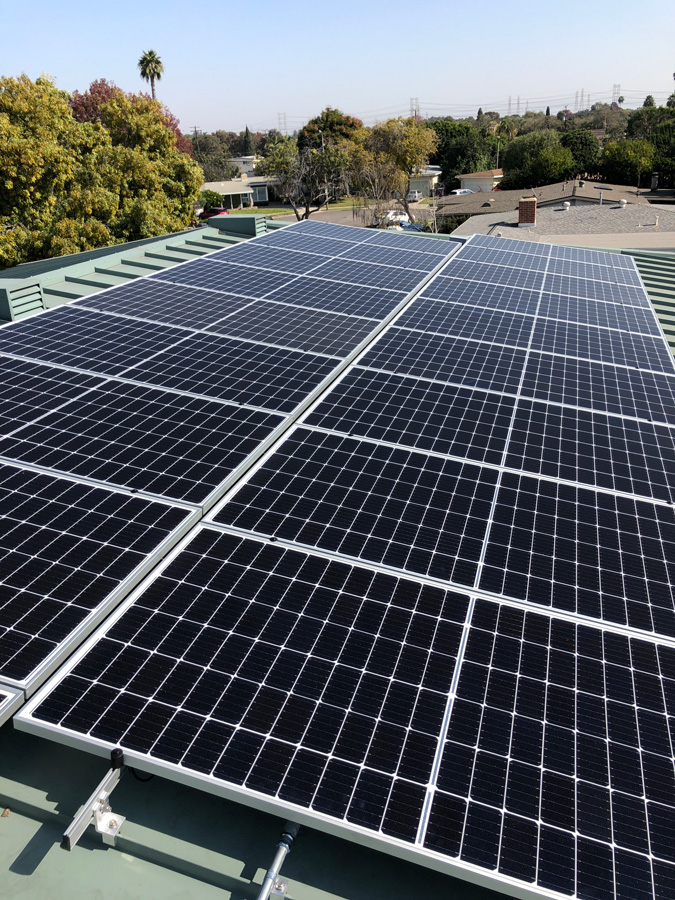
Over the last several years I had met with a couple of solar panel sales people. Usually young kids that didn’t appear to have a full grasp of what they were selling. The last thing I wanted was a bunch of monkeys up on my roof drilling holes in my metal roof, permanently compromising the integrity. Couple that fear and a lack of transparency with regards to cost, and I was not able to make a decision because I didn’t have a clear picture of the entire process. Should I lease, should I buy outright, what are the tax incentives, who gets them, what size do I need…. Etc. Maybe you have been similarly confused.
I have broken this article into general guidelines for the average consumer followed up by my nerd section for those who like details.
Buy or lease. – I chose to buy my system rather than lease. When you purchase you do assume all of the risks but also reap all of the benefits as well. My concern with leasing solar panels is the length of the lease, often 20 years. If you are going to sell your home, leases stay with the property and transfer to the new buyer. I have seen several instances where leased solar systems do cause buyer resistance. If you were to sell your home 10 years into a 20 year lease, the buyer will have to accept the lease as part of the sale. Or the seller will have to agree to pay off the lease. When purchasing a home, a buyer may be financially stressed. Worried about interest rates, coming up with the down payment, qualifying for a home loan, and home inspections. Taking over the lease adds complexity. A buyer may not be capable of figuring out the legal and financial ramifications. If the buyer can’t wrap their heads around this lease then they may want to negotiate with the seller to pay off the system.
The homeowner must now negotiate with the solar company to buy out the balance of the lease. A lease that is profitable for that company and making that company money. My experience is that the solar company will likely want the homeowner to pay a premium for the system to make up for their lost revenue. They will not offer you a price based upon it’s true depreciated value. They hold the lease and they are in control.
When you lease the panels you don’t get to the 30% tax credit, the leasing company gets the tax credit. On a $20,000 system the 30% Federal Tax Credit is worth $6,000.
But what about maintenance? When leasing I don’t have to worry about maintaining the system. Maintaining solar panels is largely a false premise as solar panels are largely not in need of maintenance. Equipment failures are covered by most manufacturers 10-20 year warranty and if you are careful in the selection of a good local installer, they will stand behind any problems that arise. The newness of solar technology has us falsely believing we need to have an intermediary help maintain a solar system. You wouldn’t contract with a third party company to install a refrigerator and provide you with refrigeration for your home? Yet refrigerators are more likely to fail than solar panels. The only maintenance your solar panels may need might be cleaning dirt off them to maintain their efficiency. Dirt can reduce efficiency by as much as 15%.
If you don’t have the means to buy the panels with cash or a loan and leasing still provides you with cost savings then by all means leasing can be a win, but as a rule of thumb purchasing is more profitable and simpler.
Who might benefit from solar?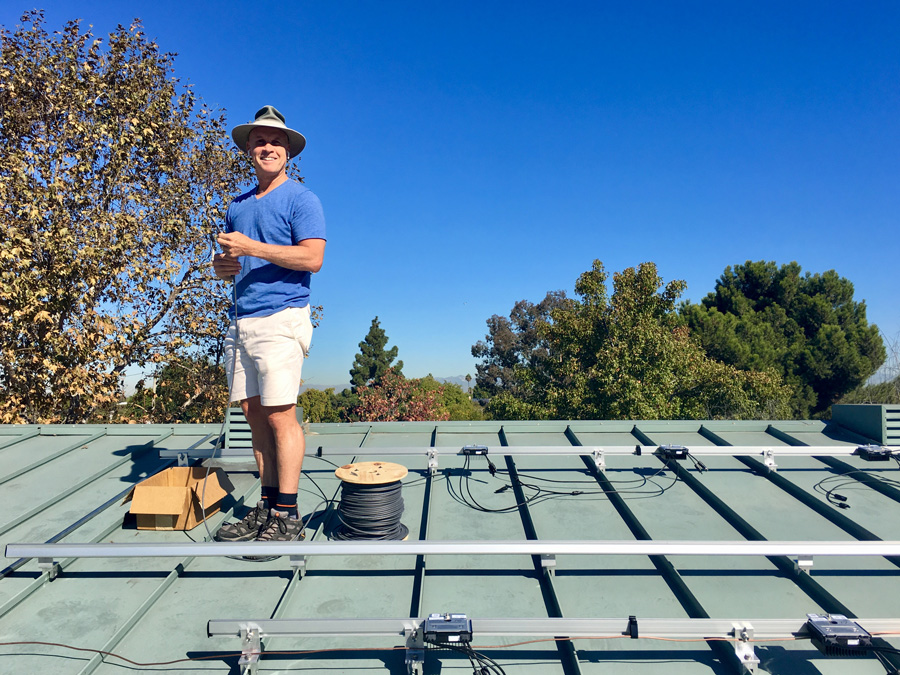
Those with medium to larger electric needs and those with a free space on a preferably unshaded southern facing roof. Obviously the more electricity you use the more you will benefit from solar. The ideal location for solar panels is South Facing at an tilted angle of 35%. North facing won’t work, but east and west facing will, there will just be about a 20% reduction in panel production.
System Sizing – What is the right amount of solar
I will get more into system sizing in the nerd section, but in general you want a system large enough to provide for as much of your electrical needs as possible. This may be limited by roof layout. However, you do not want to over produce more than you use because SCE compensates you for excess production at a very low rate.
How does the meter running backwards work? – Net Energy Metering 2.0
The current method of checks and balances with your SCE electric meter works as follows. You get credit for the excess energy you produce during the daylight when your solar panels are producing and can you use this energy back during the night. This also applies during longer summer days when your monthly production will outpace your usage. This excess summer production can then be used back during shorter winter days. Then every year on your anniversary date, your usage resets and you are charged for your net usage for the year or issued a check for over production. While you are charged about 23 cents on average for electricity used, you are compensated only at the rate of 2-4 cents for over production. So over production isn’t cost effective.
Typical Solar Needs and Costs – An Example
Here are some rough numbers for a homeowner with a $220 monthly SCE bill. For this homeowner I might suggest a 6kW system. This 6kW system if placed on a roof in Long Beach on a 30 degree south facing roof with no shading would produce around 10,000 kWh per year which at 23 cents per kWh would result in a savings of around $2,300 per year. This 6kW system would cost about $21,000. Installed solar systems in SoCal are costing about $3.25 – $3.50 per kW. But wait!… If you pay for the system yourself, even if you finance the system, YOU get the 30% tax CREDIT. Your federal tax bill will go down by $6,300 ($21,000 & .3). So your actual cost for the system will only be $14,700.
The nerd section below will get into more details about how to adjust the above example to your needs.
Financial Return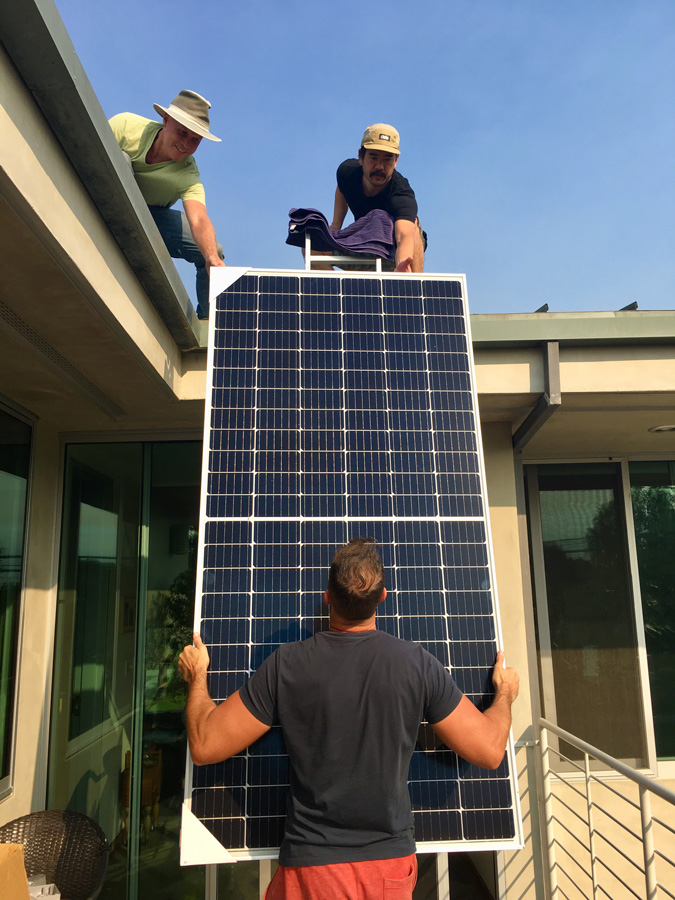
The system will then pay for itself in about 6.5 years. Or your investment will return 15.6%. Either way free electricity after 6.5 years for the life of the system. Or a 15.6% return? These are some pretty good numbers.
Planning for an Electric Vehicle
SCE by default does not want you overbuilding your solar system. They want the system limited to your last year’s annual usage. However, I built my system about 10% over my last years usage knowing that I would be more likely to run my AC now that my electricity was free! SCE does allow you to overbuild your system if you plan on using more electricity in the future. Similarly this is true if you add an electric charging station in your garage. Your system should be sized to account for this vehicle. If you have or plan on getting an electric vehicle now is the time to adjust.
Conservation First
The best savings are obviously first made by reducing your current usage. For years electrical usage has been growing, but in the last 5 years there have been big improvements in electrical efficiency . LED light bulbs have finally become cheap, and tv’s and computers have become much more efficient. Before settling on your system needs make sure to consider replacing old appliances that may be inefficient and upgrading all light bulbs to LED.
Look for a local installer
After reading many horror stories of people signing up with large national companies that go bankrupt or are bought out and have trouble getting service from their original installer, I am convinced that the reputable local installer is the way to go. One with at least a 10 year track record. I have my opinions on different equipment and what are the pros and cons. But by far the most important decision you will make will be the installer you choose. A quick survey of your neighborhood will easily reveal 3-5 recent solar installations. It is as simple as getting references from your neighbors. Maybe even neighbors that had panels installed 1-3 years ago, which is long enough to expose any reliability and warranty service issues.
The Solar Industry is just coming of age.
As recently as 2010 solar costs were about $7.5 to $8 per installed kW. Today’s $21,000 6kW system would have cost upwards of $50,000 just 9 years ago. Most of the reduction in costs has been in the area of material costs as labor costs have not gone down. Either way the ROI on todays prices certainly makes solar more viable than just 9 years ago. But this also means that it is an industry in flux. It is a high growth industry with big profits and lots of change. There will be many companies or products which will not be around in 10 years.
Upgrading an Existing Panel
The above estimate for installation assumes that your current electrical panel can handle the extra load. If your panel is older or outdated a new panel capable of adding the extra solar circuit breakers may be required. This may add about $2,000 to the cost of your project.
What is the Condition of your Roof?
Another assumption is that your roof is in good working order and panels can simply go over the top of your existing roof. If your roof is towards the end of its lifespan, you may consider putting on a new roof before installing the panels, as removing the panels and reinstalling them will add to the cost of your new roof.
For the Nerd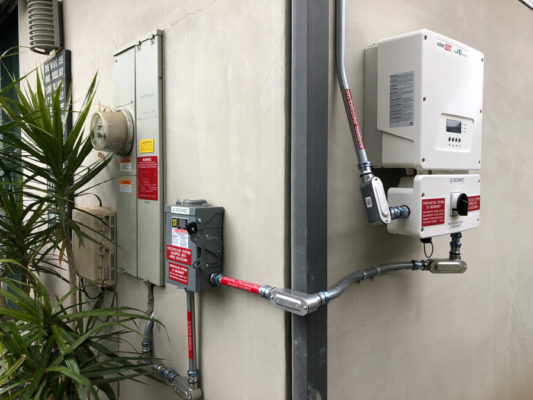

So you like the idea of the above solar example and want to understand more about your specific needs before you call a company for estimates. Well then this is the section for you.
Grid Tied System – The above 6kW system would be what is called a “Grid Tied” system. If the SCE grid goes down your solar panels automatically stop producing. This is to allow SCE to work on the system without getting shocked / killed from your panels. It is required that your system have a smart inverter with a built in auto shut down feature. To go off grid or a hybrid of both off and on grid requires batteries which are very expensive and very inefficient. I do not currently recommend any type of battery storage / off grid system for Long Beach homes.
Basics of Electrical Usage
Appliances draw a certain amount of Power, this is called Watts. But SCE doesn’t charge us for Power, they charge us for how much Power we use over time which is Energy or Watt Hours or kWhr’s or KiloWattHours. Let’s say we had either ten 100 watt light bulbs or a 1,000 watt hair dryer. If we ran either of these items for 1 hour then we would consume one kWh (1000 watts * 1 hour) of Energy and SCE would charge us about $.23.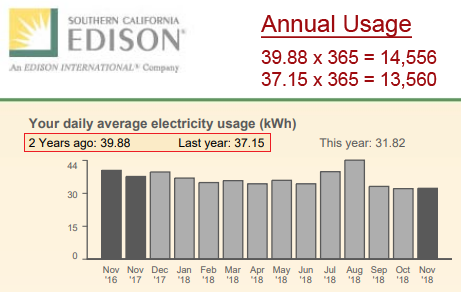
Your SCE Edison bill will list your average daily kWh’s used right above the monthly bar graph on your bill, or you can log into your account online and download your historical usage. Most homes will have a daily kWh usage in the range of 20 – 40. Multiply last years daily average by 365 days and you will have your total kWh’s used for the year. It should be in the 7,000 to 15,000 range. The above $21,000 6kW system in the example produces around 10,000 kWh per year.
The 6kW system designation is based upon how many kilo watts ( not kilo watt hrs ) the system can produce under ideal conditions. This system, as an example might be made up of 20 x 300 watt panels ( 20 x 300 = 6 kW). So then how do you calculate or estimate how many hours the system is up and running and how many kWh are produced over the course of a year?
Well lucky for us the government has a great on-line calculator that takes into account the exact geographical location of your home and the orientation and tilt angle of the panels. The website is PVWatts. Google PVWatts or go to https://pvwatts.nrel.gov/ . Input your address, the system size, direction and tilt angle of the array. If your panels go on more than one roof orientation, ie some panels on a south facing roof and some on a west facing roof, you may have to run separate PVWatts calculations to determine the power production from each location (array). You may also input your electrical costs to determine savings. I use $.23.
The SCE bill the right is mine and the PVWatts projection is based upon my system. Since I had enough roof space I chose to build my system at the higher end of my needs. I did this for the simple reason that I now can run my AC and not feel guilty and I don’t have to bitch at people for leaving the lights on. I have read that the PVWatts calculator is somewhat conservative by up to 10%. As I develop historical data on my system, I will be able to confirm this feedback from solar forums. With 2 months of performance data, my system is performing about 8% better than projections. Keep in mind that weather will greatly vary from month to month. One rainy day can wipe out solar production for that day and reduce monthly production by 3%. Dirty panels can reduce production by as much as 15% and solar panel production can degrade by as much as 1% per year as panels age.
When you select your system size you definitely don’t want to overbuild as excess solar put back to SCE’s grid does not offer a great return, there is however some piece of mind in knowing that you have your needs covered. Plus getting the extra capacity done up front is going to be cheaper than upgrading later.
South, East or West Facing?
The ideal orientation for your panels will be south facing, but not all houses have enough south facing roof. The next best location will be west facing. While east and west facing panels will produce the same amount of energy over the course of the day, west facing produces more energy towards the end of the day and east facing will produce more energy towards the beginning of the day. While you may currently be on SCE’s tiered billing system right now you will be required to switch to a Time of Usage billing plan (TOU). With this billing system, 2 pm is the time when electricity gets more expense. Going from off peak rates of 26 cents to on peak rates of 46 cents per kWh. West facing panels will produce more of their daily energy during this expensive rate period and would be preferable to east facing panels even though total daily energy production will be about the same.
About Solar Panels
Panels basically come in two sizes. 60 cell panels which are usually 40” x 66”. Or 72 cell panels which are 40” x 78”. These are commonly referred to as residential and commercial solar panels, but you can use which ever size allows you to maximize coverage on your roof. 60 cell panels will range in power from 250-330 watts and 72 cell panels will range in power from 320 – 400 watts. Solar panels are largely a commodity, meaning that there is little advantage to paying twice as much per watt for a particular panel, as there isn’t a huge variation among Tier 1 brand panels in terms of quality or efficiency. Regarding equipment, I would be more concerned with spending money on quality installation and inverters.
There are Three methods of Converting DC to AC (more nerd stuff)
Solar panels produce direct current ( DC ). This DC electricity needs to be converted into alternating current ( AC ) to tie into your main panel. This is the job of an inverter, to convert DC power to AC. There are three inverter technologies used for solar systems.
The simplest method is a straight inverter. Each solar panel is wired in series and connected to the inverter which is often located next to the main panel. Panels are often wired in two strings to limit voltages. While this is the simplest and most cost effective method, solar panels connected in this manner will only produce power to the ability of the lowest producing panel. This can be a big negative depending upon shading. The second technology is micro inverters. Micro inverters are individual panel level inverters that convert DC to AC at a panel level on the roof and then AC power is sent down from the roof rather than DC power. The main company that uses this technology is Enphase. The third technology is power optimizers. This is essentially a hybrid of the first two where each panel receives a power optimizer which adjusts the voltage of the output so that every panel produces power to its maximum ability and sends DC power down to an intelligent inverter that manages the output of each panel. The company that manufactures this technology is SolarEdge.
The benefit of the either of the last two technologies (Enphase or SolarEdge) is that shading on one panel does not limit the power production of the entire array, panels can be at different orientations and still on the same string as other panels. Diagnosing problem panels is also much easier as these two technologies has panel level reporting.
Flush Mount vs. Tilt Mount
Most panels are flush mounted to the roof meaning that the panels are parallel to the roof surface, albeit with a 6” air gap. However if you have a flat roof or only have a north facing roof to work with it may be advisable to have the panels tilted at a more optimal angle. This adds to the cost of a system and requires an engineering review and approval due to wind lift loads.
City of Long Beach Permitting
California has put in place an express permitting process for Solar Panel installation. If your project is standard your installer will likely be able to get permits the day they go to the building department. My project had two items that kicked it out of the standard express permitting process and required engineering review which added 30 days to the process. Those variations were a standing seam metal roof and a center feed main electrical panel.
SCE Approval
You or your installer will need to submit an application to SCE to interconnect with their grid. If you are having the system installed this is something your installer should do. Once the system has received final approval from the city you can submit all of the required documents. Turn around is very quick, less than a week and in most instances you will already have the right meter. SCE will just ping the meter and turn on Net Metering. SCE standard approval process, as well a the City of Long Beach standard permitting process is only for system sizes of 10kw or less.
Longevity and Production
Solar Panels will last 20-30 years and their production shouldn’t degrade by more than 1% per year. The cost of panels today is about 1/3 of the cost 10 years ago. When it’s time look at updating my system everything will be different. Maybe at the 20 year mark or before I will be upgrading parts of the system. Certainly by then, technological advances will be on my side. This does however highlight the payback timeframe. In the above example the system pays for itself in 6.5 years. This is great because everything after that is free. Ten years ago a system would only pay for itself in 15 years, closer to the timeframe when components may need replacement making solar less of a smart value proposition than today.
For those interested in a Self Install, My System Details
After much research I settled on SolarEdge’s optimizer solution. While I didn’t have shading to contend with I liked the idea of panel level monitoring. While my system is a theoretical 9.2 kW the actual real world rating is only 8.5kW because the South facing panels are at a low 10 degree tilt which makes them less than optimal and I have a several panels that are East and West facing which produce about 20% less than the South facing panels. I went with Hanwha QCell 72 cell 385 watt panels. The larger panel size allowed me to maximize coverage on the South facing roof. My total cost was $15,000. I estimate that my system would have cost around $32,000 if it were professionally installed.
My providers for materials was Renvu.com and AltEStore.com. I found Renvu’s website to be exceptional as it assisted you in a complete materials list and quote for a job. I ended up purchasing panels from AltE because the panels I had spec’d for my project were not available from Renvu unless I bought a minimum of 290!!. For the nut like myself that decides to do a self install, Renvu also was able to provide me with complete plans to get through the permitting process as well.
Other System Details
You will need a racking system to attach the panels to the roof. This racking system is aluminum extruded rails which bolt to the rafters of the roof or in my case attached to the standing seams of my metal roof via clamps. Then the panels clamp to the rails which runs horizontally across the roof. A panel will attach to two rails, so in four locations. The brand I chose was IronRidge xr10 rails. These are the lightest guage rails made by IronRidge. Only areas of extreme wind/snow or weather conditions would you need heavier gauge rails.
Was it Worth it to Self Install?
Many people asked me how long did it take? While I don’t have an exact answer, my joking response was that for every hour a professional installer would spend on an installation, it took me 5 hours of installation time. And for every hour a professional installer spent installing, I spent 20 hours researching. Maybe with everything said and done I could have spent 200 hours researching, buying products, pulling permits, installing, testing, meeting inspectors, and completing SCE paperwork. At first this seemed like it would be a waste of time, but if I were to take the $17,000 that I saved divided by the 200 hours spent, that is $85/hour. A much better pay rate than my music career, ha!!!
The money saved however is not really the point. There are somethings that I like to learn. There are other things that I have no interest in learning. I found this project to be exciting and rewarding. Plus there is always the satisfaction of knowing a job was done right. Looking into the future as well, it is a very simple system to maintain and I know just the right person to call if there are any problems.
Other Sources of Information
I am sure I could write several more pages, but most of what I would share might be more easily understood via youtube videos. Which certainly are a great source of information. There were also many good videos on Renvu.com and AltEStore.com websites. The final source for information was a web forum called SolarPanelTalk.com. While all of these sources were very helpful, there is no doubt that the web takes quite a bit of time. One book constantly recommended on the forum was “Solar Power Your Home” from the Dummies series. I did not read this book, but this might be a good complete source of information. Best of luck with your solar journey.
And finally if you don’t feel like wading through hours of videos and books and have questions about your home, we invite your call.